|
Installing Devices - Motherboards
This isn't real difficult if you follow along with your motherboard manual. The hardest part is setting it into the case. Before you put it in the case however, you must configure the motherboard. This is done with jumpers.
***Modern motherboards such as the Intel P4 and AMD XP/64 motherboards do not have any jumpers that need to be configured to get the system up and running. The odd jumper can be found on some connectors such as sound, usb power and the cmos. These jumpers do not have to be touched tho unless you want to clear your cmos or add a front sound port.
how to hook up computer motherboard
The jumpers on the old boards can be found on the motherboard as little plastic caps. These may be black, yellow, red, white and so on. They come in different colors depending on the company or manufacturer who made the board. You will have to set the clock frequency, CPU voltage and others. The best way to do this is refer to the motherboards manual. I cannot tell you what the jumper settings are for your mother board since there all different. If you do not have a manual, contact the manufacturer or look on there website. Many motherboard makers offer full schematics of there motherboards along with manuals in PDF format..
 |
Picture of motherboard jumpers |
-Also prior to installing the motherboard you will want to install the CPU, Heat sink, Fan and System Memory. Look at the procedures for these at: |CPU and Heatsink|Memory|
-If you got the motherboard configured you will need to pay attention to the case. Some cases have removable motherboard trays that aid in the installation of a motherboard, if so you are in good shape. Simply remove by unscrewing it from case. If you haven't you should still be ok, but it could be fiddly in a smaller case.
-Set Up Case- hook up case to motherboard
-First you need to setup the case to except the motherboard. This is done with using brass standoffs or plastic retainers in combination. What you will need to do is set the motherboard in the case and align it. You want to get an idea of how it will fit into the case and the I/O shield on the back of case. Now, when you spot the holes on the case motherboard plate align the motherboard with them. Mark the holes so you will know were to screw your brass standoffs into.
 |
The I/O Shield located on Back of System Case. Your case may have the wrong shield for your motherboard. The motherboard should have a replacement I/O shield with it. |
-The reason we want to mark the holes for the brass standoffs is so you don't accidentally put one in the wrong place. If you do there is a chance (BIG) of shorting out the motherboard. If this happens there is a good chance you will need a new motherboard. I don't want to see this happen to you as it happened to others.
 |
Screwing motherboard in ..snug |
 |
Motherboard in case |
-Power-
-Now that motherboard is in case we need to hook up Power. The power connectors can be identified as a 20-Pin for the ATX and the 4 pin 12v square connector.
 |
ATX 20 pin connector. Note the way the connector is keyed. You can only install one way. |
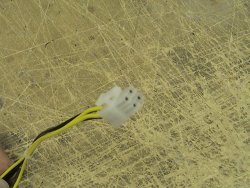 |
4 pin 12v connector required for some Athlon XP/64 and Intel P4 processors. |
-The connectors simply just plug into the motherboard. The 20 pin connector is a easy one that cant really be done wrong unless you force it. Even if installed wrong you will know something isn't right. The 12volt connector is similar in that it can only be put in the motherboard one way. You will hear them click when they are installed correctly.
 |
How to Hook up busy light leads |
-These leads are easy to hook up. Don't worry if you get them on the wrong post. If so you can always come back and try another way. The best way to do this is refer to the motherboard manual and look at the leads themselves. They are marked as seen below.
 |
Indicator busy light leads |
-That wasn't so hard now was it?
 Selecting the Best Motherboard Selecting the Best Motherboard
Back To Hardware Guides
Popular Articles:
How To Build A PC | Different Types of Keyboards | Help with Hard Drive Installation | Computer Networking Basics | Introduction of Motherboard Functions | Computer CPU Processor Speed | Upgrade from Windows 95 to Windows 98 | Computer Monitor Troubleshoot | Partition Hard Drive | Installing New CPU Processor | Types of Network Cables |


